
On this page
MindLap is an AI-native suite for software engineering where autonomous AI agents collaborate with human developers to build software in fast, iterative cycles called "Laps." Instead of traditional weekly sprints, MindLap runs development cycles in hours using specialized AI agents that can plan, code, review, and test.
This guide walks you through three simple steps to get up and running:
- Install the MindLap CLI
- Connect your AI coding tool (Claude or Codex)
- Configure your project
After setup, scroll down to learn about the core concepts — Projects, Laps, Agents, Skills, Stories, Documents, Omnibox, and Connections — that make MindLap powerful.
Get the MindLap CLI installed on your machine with a single command.
1
Install MindLap CLI
Open your terminal and run:
curl -fsSL https://mindlap-cli.s3.amazonaws.com/mindlap_cli/releases/bootstrap.sh | LAP_BASE_URL=alpha bash2
Verify it works
Check that the CLI is installed correctly.
lap --versionYou should see the version number printed. If you get "command not found", restart your terminal and try again.
That's it — you're installed. Next, connect your AI tool.
MindLap works with your favourite AI coding tool. The lap connect command links MindLap to your AI tool so it can pick up tasks automatically and start working on them.
If you use Claude as your AI coding assistant, run:
lap connect --tool claudeIf you use Codex, run:
lap connect --tool codexWhat does this do? When you run lap connect, MindLap starts listening for tasks from your project. When a task arrives, it sends it to your AI tool to work on. Think of it as a bridge between your project board and your AI assistant.
Press Ctrl+C to stop the connection at any time.
Tell MindLap which organization and project you're working on. You only need to do this once — or whenever you switch to a different project.
1
Authenticate with your token
This connects the CLI to your MindLap account and selects your project.
lap auth.login --token "<your-token>" --org <org> --project <project>Here's what each flag means:
--token— Your personal authentication token (found in your MindLap dashboard settings)--org— The organization you belong to--project— The project you want to work on
Don't have a token yet? Go to your MindLap dashboard settings to generate one, or ask your team admin.
2
Verify it works
Make sure your config is correct and you're connected.
lap auth.statusYou should see your org, project, and connection status. If something looks wrong, re-run the login command with the correct values.
Core Concepts
Now that you're set up, here's everything you need to know about how MindLap works. Each concept builds on the previous one.
A Project is the top-level container that scopes all your work. Projects belong to an Organization and contain everything — laps, agents, skills, documents, and connections.
When creating a project, you choose between two types:
Existing Project (Brownfield)
You already have a codebase. MindLap will scan it to detect frameworks, dependencies, and project structure so agents can work with your existing code.
New Project (Greenfield)
Starting from scratch. MindLap helps you scaffold the project structure, set up architecture, and build your first feature with AI agents.
Each project has its own:
- Laps — Fast development cycles (like sprints, but in hours)
- Agents — AI workers configured for your project
- Skills — Reusable knowledge files that enhance agents
- Documents — Files, diagrams, prototypes, and more
- Connections — Integrations with GitHub, CLI, and other services
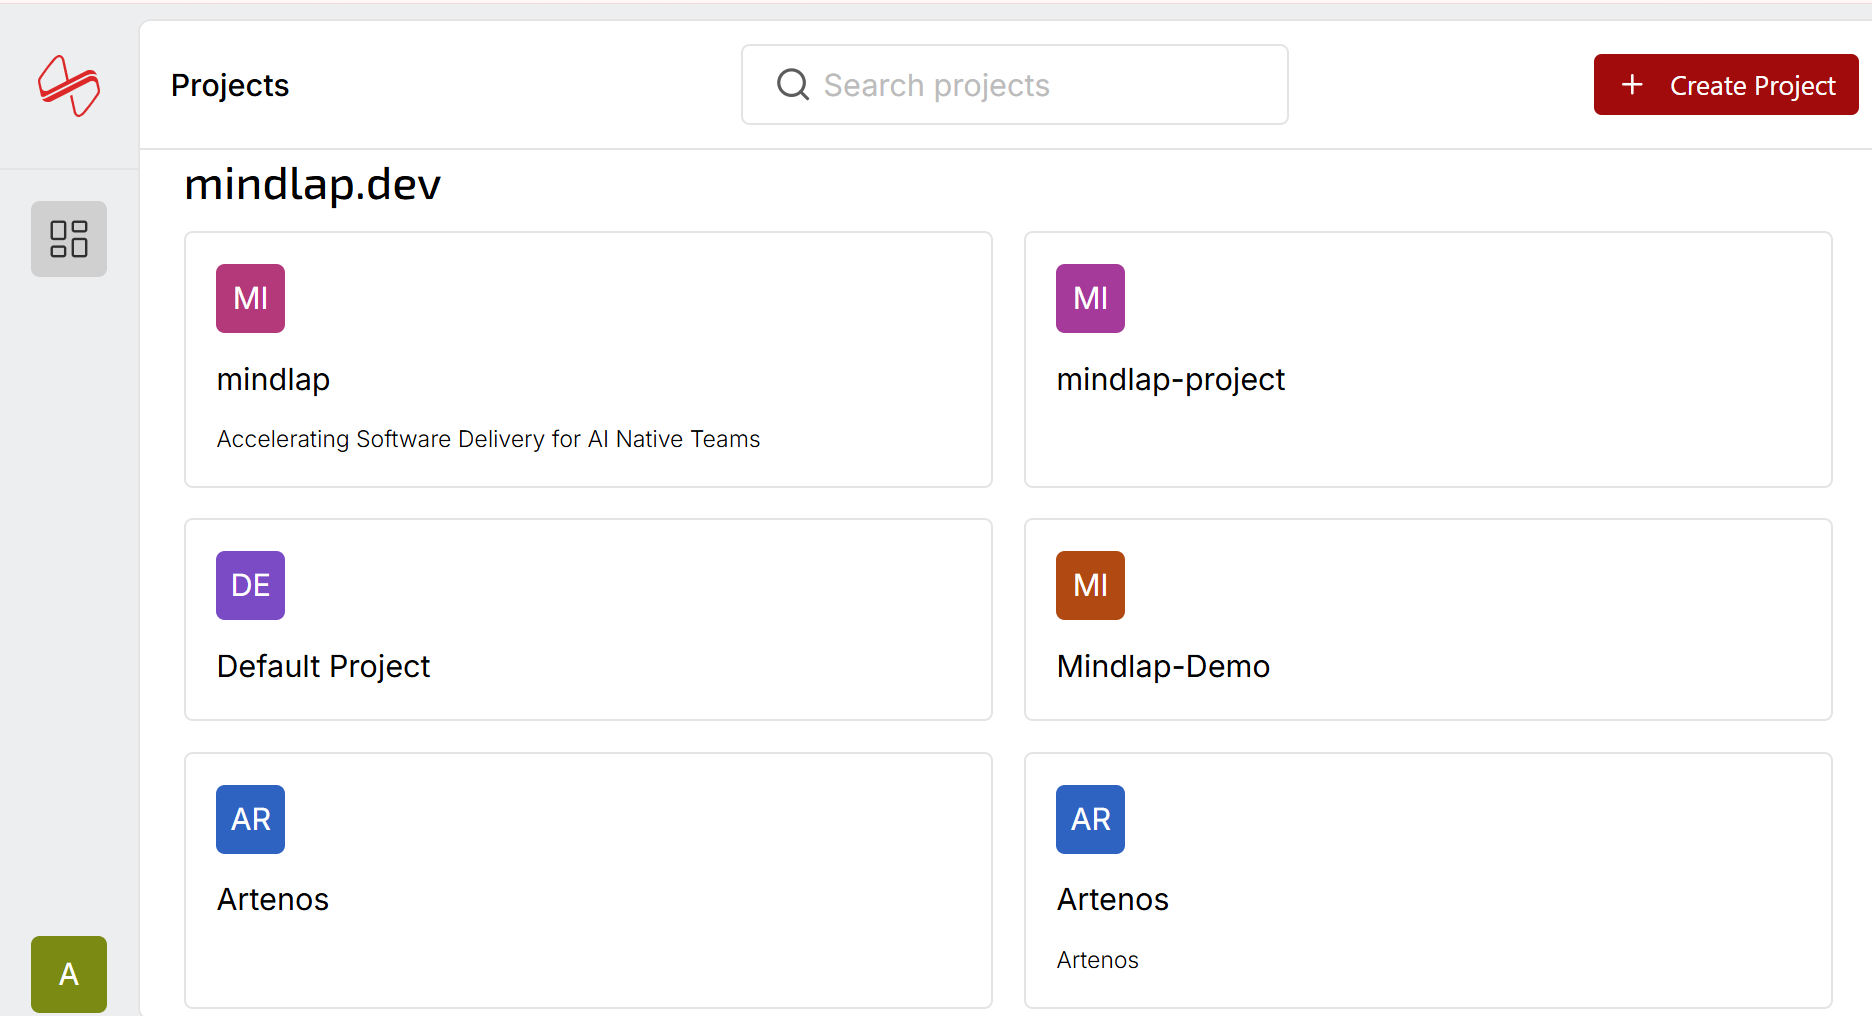 Projects page — view and manage all projects in your organization
Each project is self-contained — agents, skills, and connections are all scoped to the project level. You can have multiple projects under one organization.
A Lap is MindLap's equivalent of a sprint — but designed to run in hours, not weeks. It's a container for organizing related work into fast, AI-driven development cycles.
A Lap contains Stories — individual units of work. Think of a Lap as a folder that groups related tasks together:
Every Lap moves through these stages:
| Status | Meaning |
|---|---|
Formation (OPEN) | Planning stage — add stories, define scope |
Active (IN_PROGRESS) | Work is underway — agents and humans executing stories |
In Review (IN_REVIEW) | Work complete, under review |
Completed (DONE) | Lap finished successfully |
Archived | Hidden from default view but preserved |
- Create a Lap with a title and goal (e.g., "Implement user authentication")
- Optionally assign a default agent (e.g., Product Manager) to help break down the work
- Add Stories (individual units of work) to the Lap
- Stories move through a Kanban board (Open → In Progress → In Review → Done)
- Complete the Lap when all stories are done
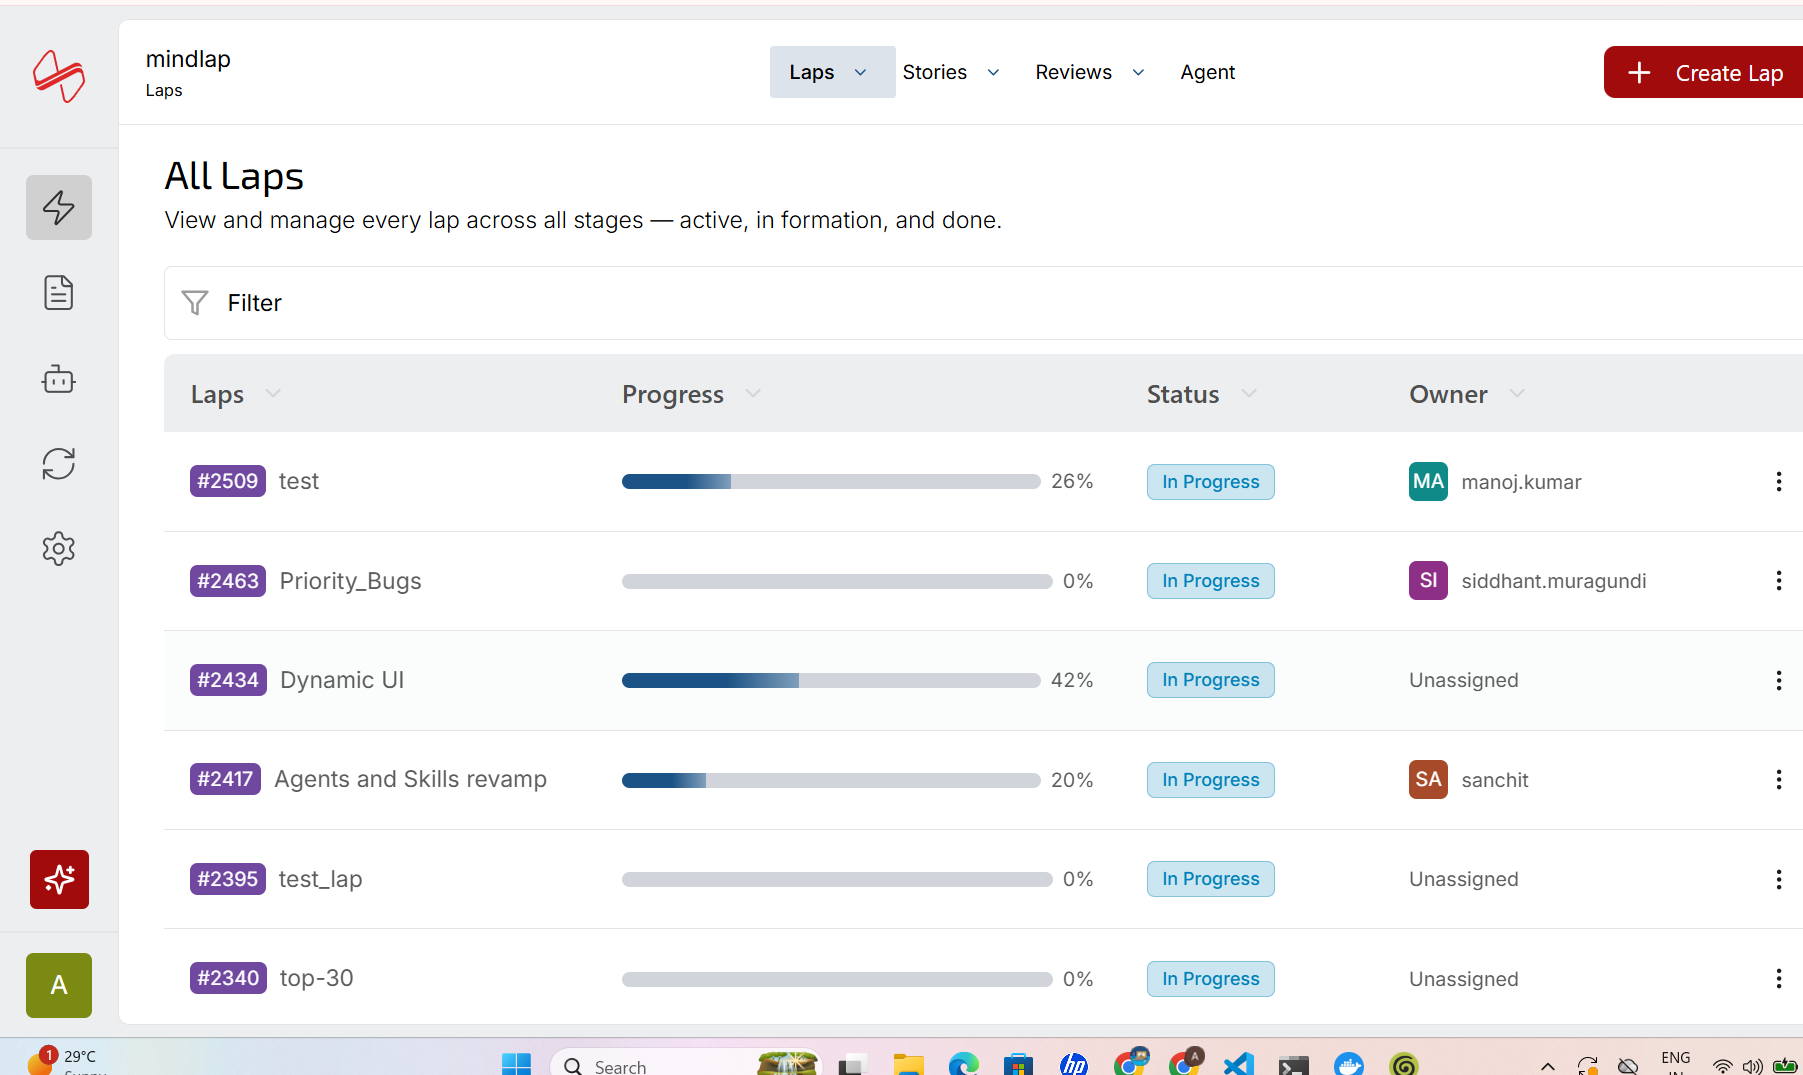 All Laps — view and manage every lap with progress, status, and owner
The platform gives you different views to filter your Laps:
- All — Every lap in the project
- Active — Currently running laps
- Completed — Finished laps
- Formation — Laps still being planned
- Archived — Archived laps
Unlike traditional sprints that take weeks, Laps are designed to run in hours. This means faster feedback loops and more iterations.
An Agent is an autonomous AI-powered role that can be assigned tasks. Each agent has a specialized purpose, custom instructions, and linked skills. When assigned a task, agents execute autonomously, streaming output in real-time.
Every project comes with a set of default agents ready to go:
| Agent | Purpose | Default Skills |
|---|---|---|
Product Manager | Plans features, defines requirements, breaks down work | Task Breakdown, Scope Analysis, Priority Setting |
Developer | Writes, tests, and refactors code | Write Code, Write Tests, Refactor, Create PR |
Engineering Manager | Reviews code, enforces standards | Code Review, Create PR, Architecture Review |
QA Engineer | Tests functionality, validates quality | Write Tests, Coverage Audit, Tech Debt Scan, Dependency Check |
Designer | Creates UI/UX, ensures consistency | UI Design, Design QA, Project Scaffolding |
DevOps Engineer | Manages infrastructure and CI/CD | CI/CD Setup, Infrastructure Config, Dependency Setup |
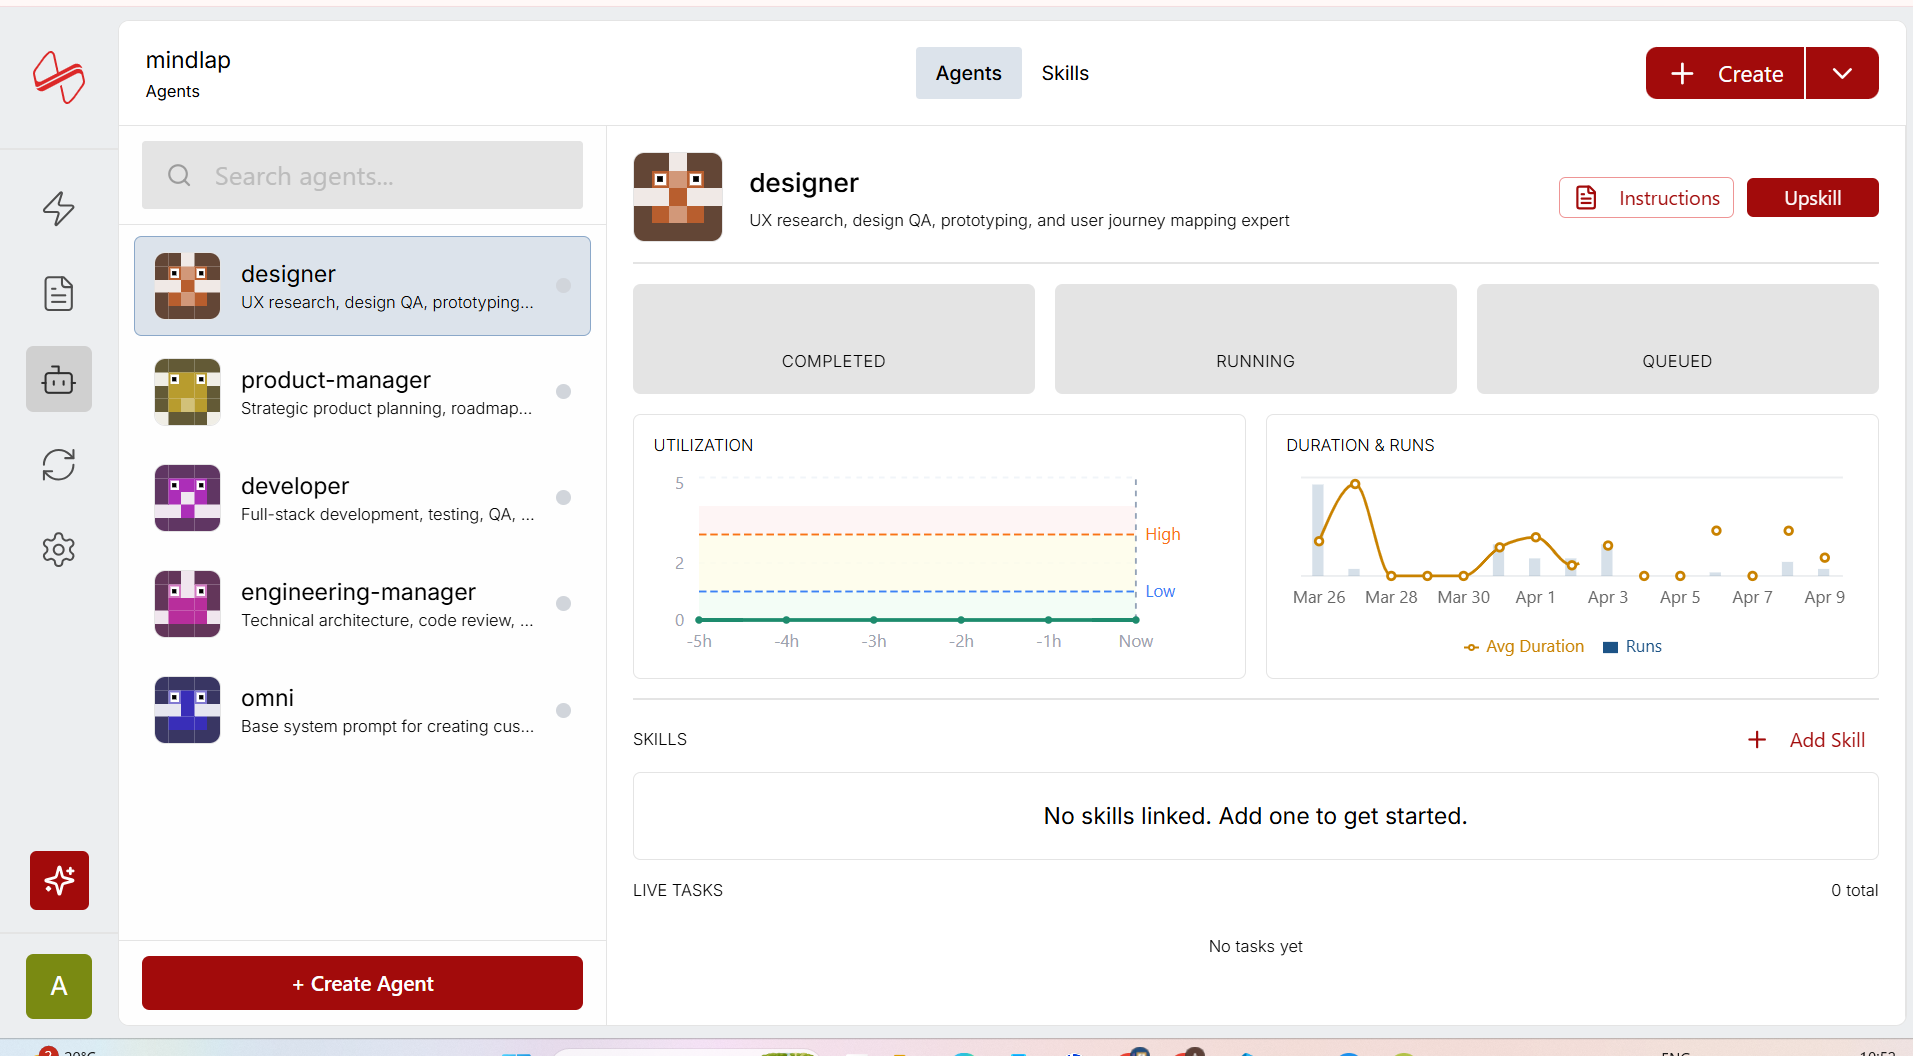 Agents page — browse agents, view utilization metrics, and manage skills
- Agents are backed by LLM models (Claude, Codex, and others)
- Each agent has instructions (a custom prompt defining behavior) and linked skills
- When assigned a task, agents execute autonomously, streaming output in real-time
- Agents can create subtasks and produce artifacts (code, docs, PRs)
Within a Story, you can trigger specific agent actions. Each action is handled by the most appropriate agent:
| Action | Handled by |
|---|---|
Feature Spec | Product Manager |
Tech Spec | Engineering Manager |
Test Harness Design | Engineering Manager |
Test Harness Code | Developer |
Implement | Developer |
PR Review | Engineering Manager |
Beyond the defaults, you can create your own agents:
- Create agents with custom names and instructions tailored to your workflow
- AI-assisted prompt enhancement helps you write better agent instructions
- Add agents from the Marketplace — pre-built agent templates for common use cases
Agents work best when they have clear, specific instructions and the right skills linked. The more context you give an agent, the better it performs.
A Skill is a reusable markdown file containing instructions, guidelines, or domain knowledge that enhances an agent's capabilities. Think of skills as "add-on abilities" for agents.
MindLap comes with skills organized into categories:
| Category | Skills |
|---|---|
Planning | Task Breakdown, Scope Analysis, Priority Setting |
Development | Write Code, Write Tests, Refactor Code, Create PR, Implement |
Review | Code Review, Architecture Review, Design QA |
Quality | Coverage Audit, Tech Debt Scan, Dependency Check |
Infrastructure | CI/CD Setup, Infrastructure Config, Dependency Setup |
Documentation & Design | Write Docs, UI Design, Project Scaffolding |
- Skills are linked to Agent Roles (not directly to individual agents)
- Each linked skill can be Enabled (active in agent prompts) or Disabled (linked but hidden)
- You can create custom skills or import from the Marketplace
- Skills live in the project's /.skills folder
- Multiple agents can share the same skill
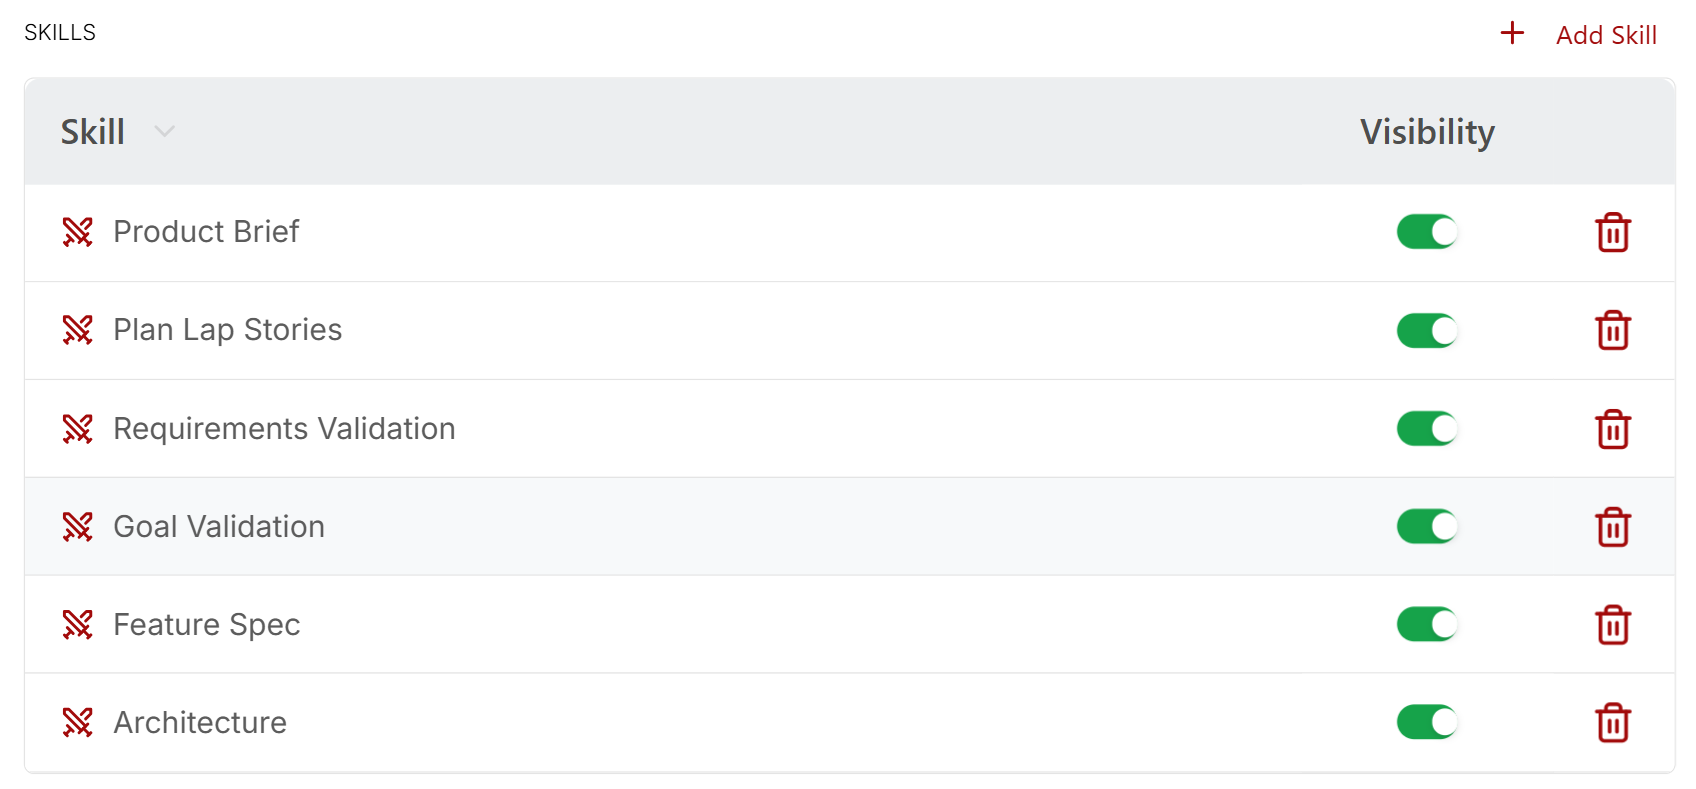 Skills — manage skill visibility with enable/disable toggles per agent
Every skill is a markdown file with a simple structure — a frontmatter header with the name and description, followed by the skill body with detailed instructions:
- Create skills from the Skills tab in Settings
- Link skills to agents from the agent configuration
- Enable/disable skills per agent without unlinking
- Import skills from the Marketplace for common use cases
Skills are what make agents truly effective. A Developer agent with the "Write Tests" and "Refactor Code" skills will produce much better output than one without.
The Task is the universal work item in MindLap. Everything is a task under the hood — whether it's a feature story, a bug report, a code review, or an AI agent execution.
Each task has a type that describes what kind of work it represents:
| Type | Description |
|---|---|
STORY | A unit of work within a lap |
TASK | General standalone task |
SUBTASK | Nested task within another task |
BUG | Bug report |
REVIEW | Code/work review |
AGENT | AI agent execution task |
MILESTONE | Major project milestone |
Tasks move through these statuses as work progresses:
→
→
→
→
Tasks can also be marked as CANCELLED or FAILED if they don't complete successfully.
Set priority to help your team and agents know what to work on first:
- HIGHEST — Drop everything, fix this now
- HIGH — Important, do it soon
- MEDIUM — Normal priority
- LOW — Nice to have
- LOWEST — Backlog, no rush
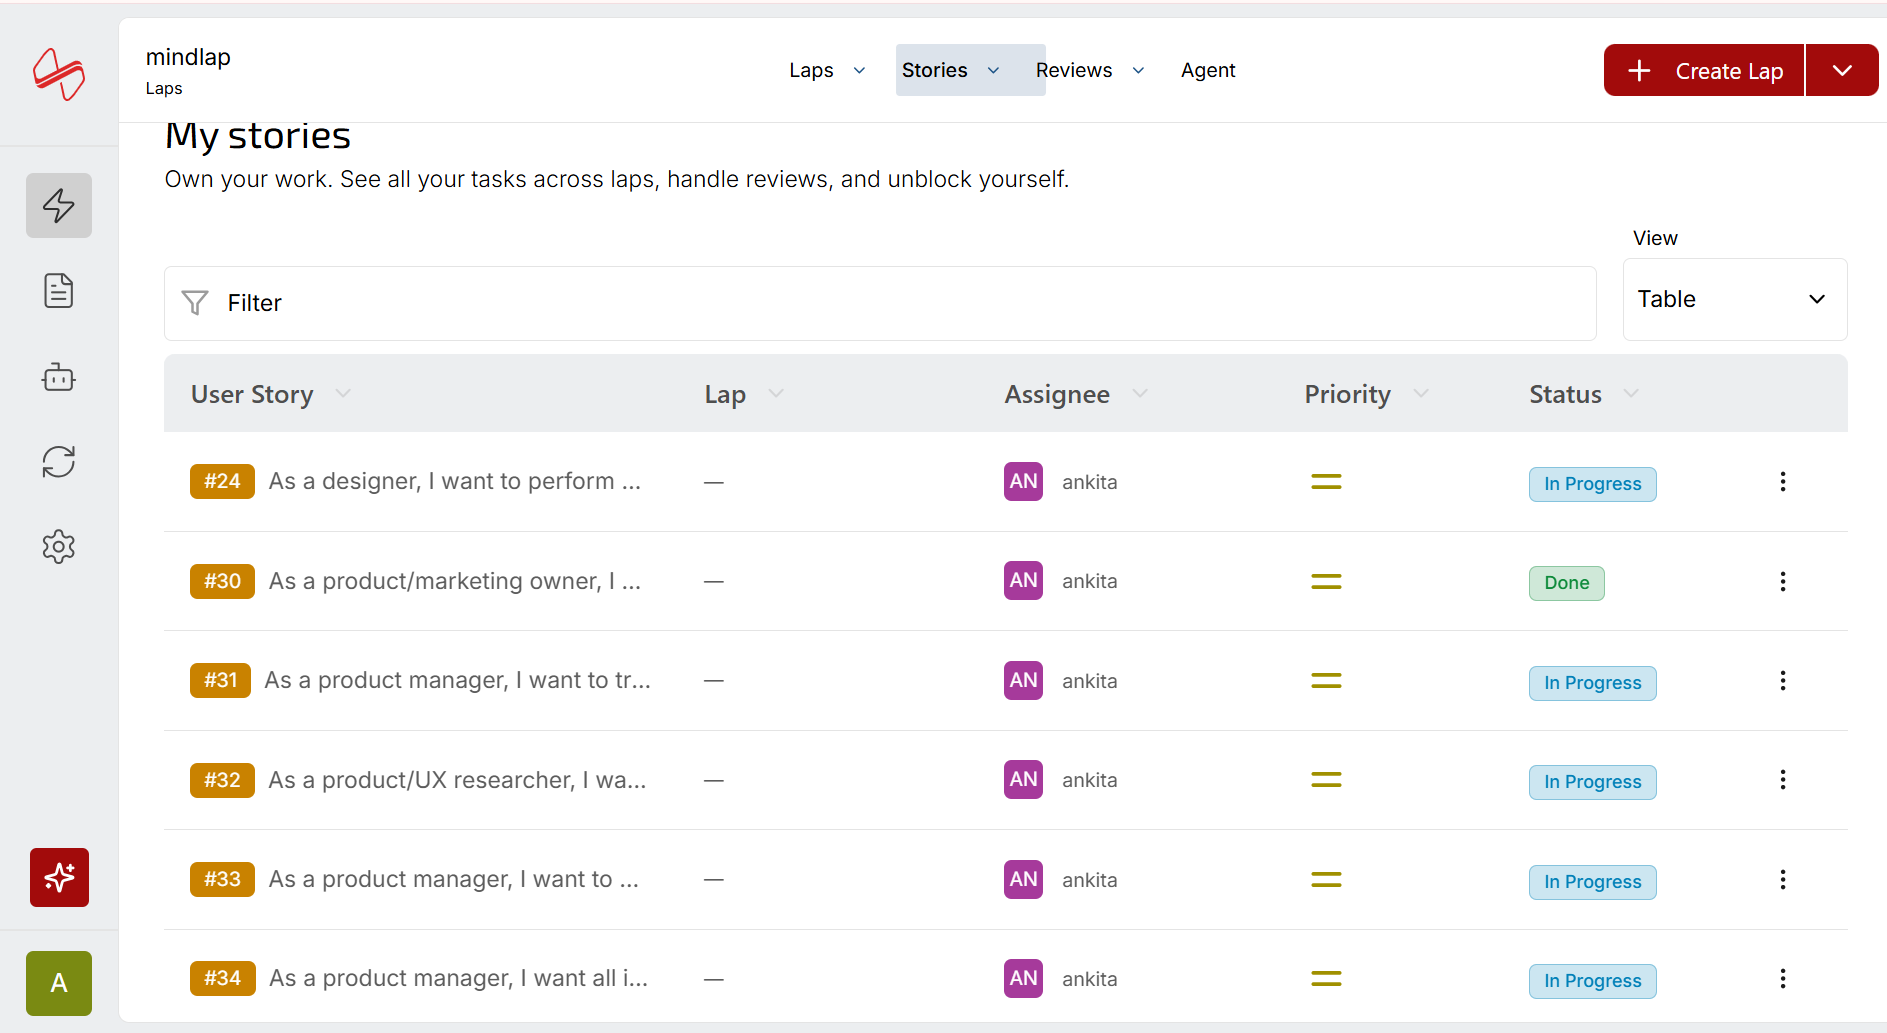 My Stories — view tasks across laps with assignee, priority, and status
Stories live inside Laps. Create a Lap for your development cycle, then add Stories to it. As agents and humans work, Stories move across the Kanban board from Open to Done.
The Documents section is MindLap's content management system for project files and knowledge. It's where you store, organize, and share all the files related to your project.
MindLap supports several types of documents:
| Type | What it is |
|---|---|
Collections | Organized folders/groups of files |
Documents | Text and markdown files |
Diagrams | Visual and architectural diagrams |
Prototypes | Design and UI prototypes |
Images | Media assets |
Patches | Code diffs |
Skills | Agent skill files |
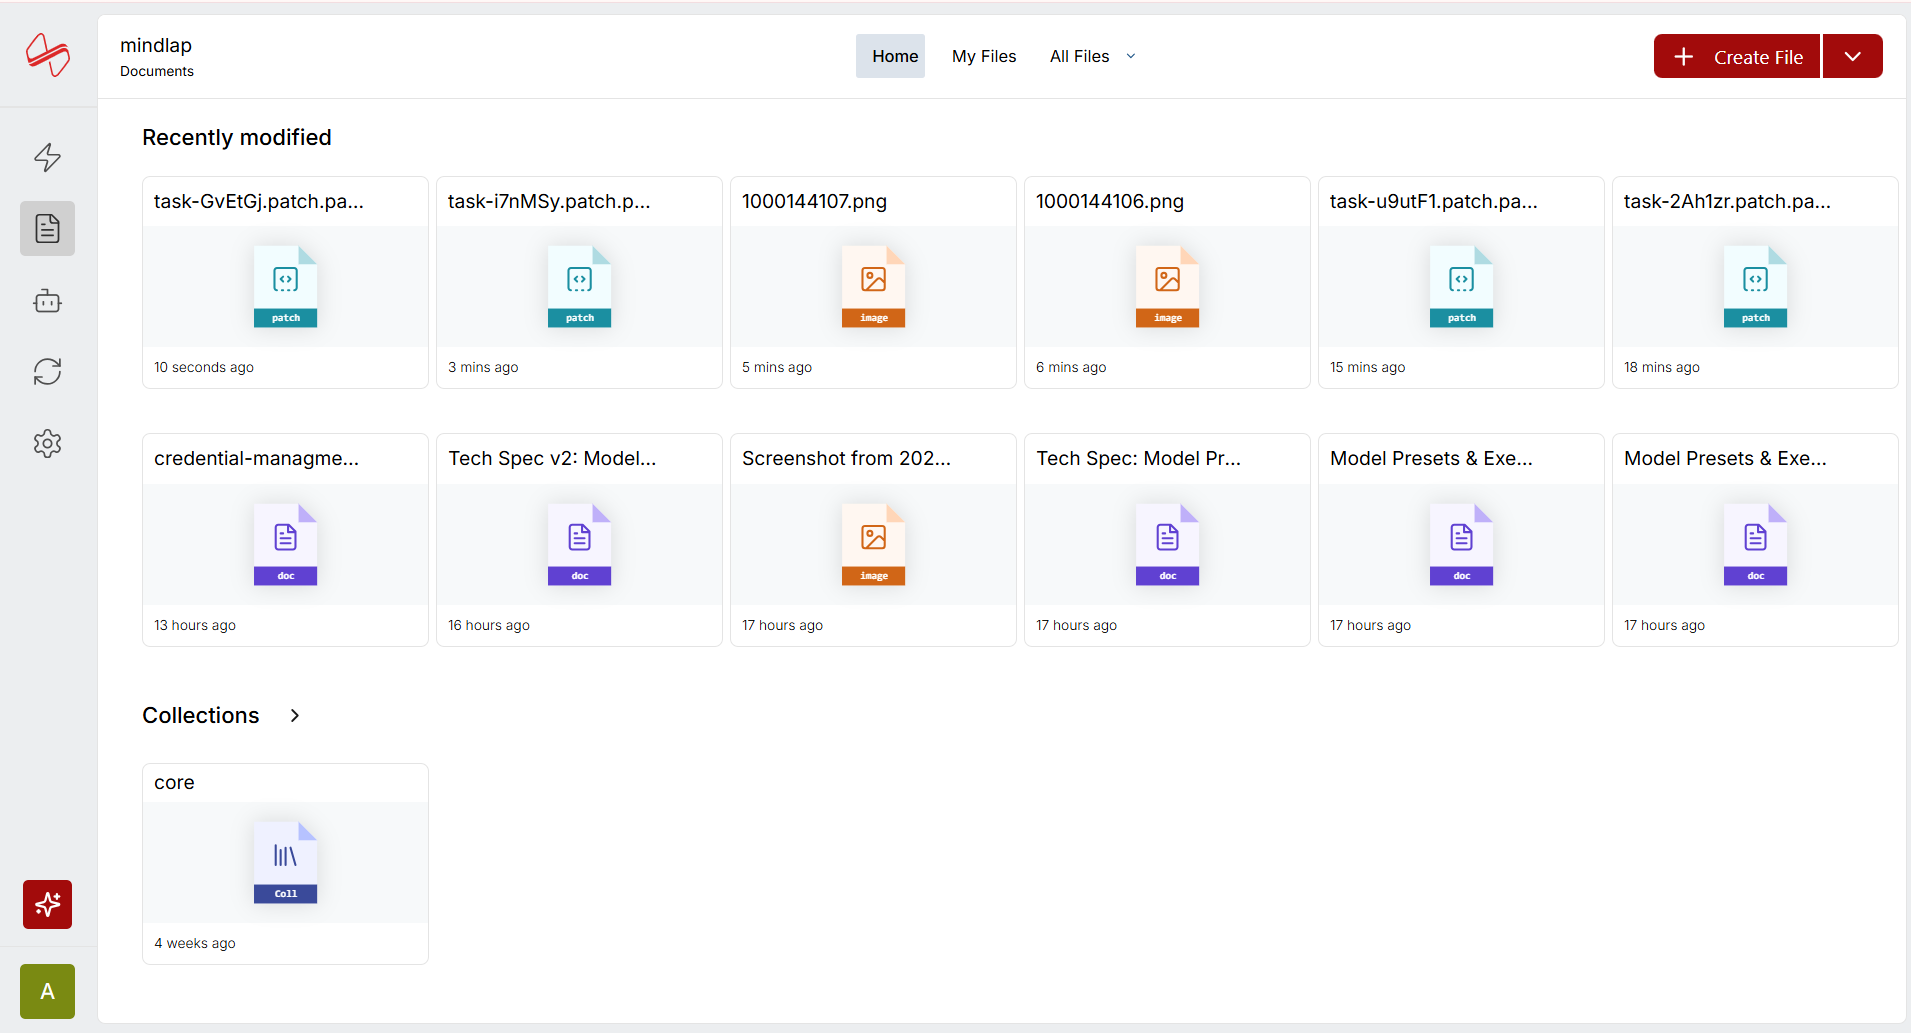 Documents — browse recently modified files, collections, and project assets
Documents aren't just for storage — they connect to the rest of MindLap:
- Link to tasks — Attach documents to Stories for context
- Feed to agents — Attach files to agent prompts via the Omnibox so agents can reference them while working
- Share publicly — Make documents accessible to external stakeholders
Upload design mockups, API specs, or architecture diagrams as documents. When you attach them to a Story, agents can reference them to produce more accurate work.
The Omnibox is MindLap's global command interface — a powerful prompt bar for triggering agent tasks from anywhere in the app. Think of it as a command palette that lets you talk to your agents naturally.
- Select which agent should execute the task
- Write natural language instructions — describe what you want done
- Attach files for context — images, PDFs, markdown, or any document
- Choose execution mode — Local (CLI worker), Project queue, or Cloud worker
- View real-time streaming output as agents work
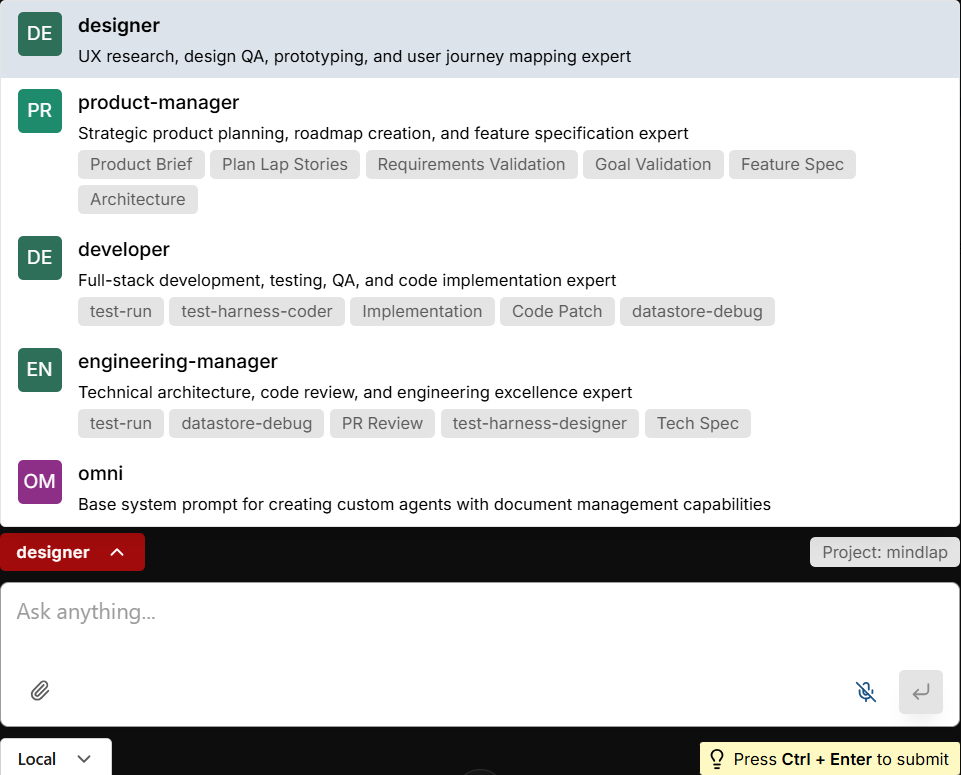 Omnibox — select an agent, write instructions, and choose execution mode
When you trigger a task from the Omnibox, you can choose where it runs:
Local
Runs on your machine via the CLI worker. Direct access to your codebase.
Project Queue
Queued for the next available worker in your project.
Cloud
Runs in the cloud via GitHub integration. No local setup needed.
The Omnibox is accessible globally via keyboard shortcut from anywhere in the app. It's the fastest way to get an agent working on something.
The GitHub connector enables cloud-based execution. Agents can create PRs, access your repo, and automate workflows — all without running anything locally. To set it up, you provide a Personal Access Token with the required scopes:
- repo — Full access to repositories
- read:org — Read organization membership
- workflow — Update GitHub Action workflows
You can use both the CLI and GitHub connectors together. Use the CLI for local development and GitHub for cloud-based automation and PR workflows.